Monday, December 29, 2008

Driver's rear fender

Today I re-installed the driver's side rear fender, including replacement engine air intake seal and black fender beading.

The engine intake seal (black rubber gasket beneath window) was $28 per pair from ISP west.

Here's the fender installed, with black fender bead (gasket) along the seam.

Tomorrow should be new windshield time!
Posted by Picasa

Saturday, December 27, 2008

Rear Windows, 12/26/08

My dad stopped by today to help re-install some of the glass. Could not do it with just myself and my 9-year-old son... needed some extra oomph! For those who have not tried this before, it takes a lot of silicone spray combined with a ton of pushing and shoving.


The black strips in the photo are electrical tape I used to hold the headliner (interior vinyl) in place. That's 3 windows down, 5 to go!

Saturday, November 1, 2008

The Fat Lady Sings!


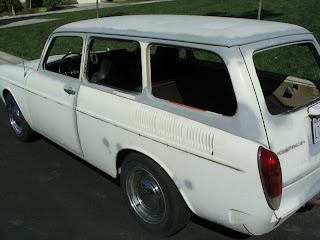
Ok, I found out that this body style of VW Squareback is called a 'fat chick' due to the larger trunk/'snout'. Could not resist using this in the title. Here are the photos straight out of the Escondido MAACO paint shop (windows still removed).


MAACO said they would re-touch this area on the gas lid for free. Otherwise no complaints for the $1500 they charged me.

Monday, October 13, 2008

10/13 Off to MAACO

I had a local shop quote me over $4k to sand and paint the vehicle. This included $1200 in materials (!).

I want to drive this thing before gas gets to be $10 a gallon and asked them for a referral. They said the local MAACO in Escondido should be able to do a serviceable job for under $2k. They quoted me around $1500 to do some sanding, prep, and re-paint the factory color. We'll see how it goes.

Not having a windshield installed made it a bit challenging to drive 6 miles to the local shop. Ski goggles came in handy!

Here's the 'before' shots of the condition of the squareback before drop-off:


Dig the plate?

10/11 Golden (Bondo) Shower

OK it's been a while... I went out of action in mid-March for shoulder surgery, adopted a baby in May, and was out of the country from mid-June through mid-July. Long story short, I'm back in action, and back to getting this thing ready for paint. There's lots of POR-15 in the window sills, covered up with some primer.

I wonder, of the old VW's still in existence, how much steel is remaining and how much POR-15 has taken place of the metal?

Did some more bondo/sanding work on the car to get it ready for paint. Here are the shots:


Before - Note the dings. I ground down a few inches of cracked bondo and then filled in w/Lead filler.


After. I used mostly lead filler with a 'skim coat' :) of bondo over it.
Here's the dreaded welded-in patch. After a full weekend of sanding and build-up, you can hardly tell the difference between the original and replacement piece.

Here's the area beneath the passenger headlight. Nice and smooth!

Passenger door and rear quarter panel... good to go!

Sunday, May 11, 2008

5/10 Yet more fun w/ MIG Welder (Tool Time)

Using 1 1/2 inch x 1/8 inch steel L-bracket, I welded together a Type 3 generator belt wrench to hold the 24mm pulley nut, just like the one in the John Muir "How to keep your Volkswagen Alive" book.

This is more how I was expecting the welder to work in the first place. Much better. Now All I have to do is cut the 24mm groove in the short end. I'll do this @ work, where we have some s-weet tools in the 'mechanical assembly area'.

5/10 More fun w/ MIG welder (Passenger Front Fender)

A bit more proficient w/ the welder after the first few passes (btw, I DID practice on some scrap metal first). Still burns the fender sheet metal like tin foil. Heres the spot below the headlight and the spot right behind the wheel:

5/10 Fun with MIG Welders

Here are some shots of welding I did with the Home Depot Lincoln Electric HD100 flux-core MIG welder. The infernal bugger burns through sheet metal like it's tin foil.

I had better luck making a tool out of 1/8 inch steel L-bracket (next post).

Maybe I should use one with the inert gas upgrade next time? Does the gas cool the area so you don't get so much burn-through?

Here's the driver side Rear Quarter:


I think I'll fill in the holes with some Metal Glue on a caulking gun, then cover w/filler/polyester. What a mess! At least I didn't start a fire!

Here's the inside. I welded a strip of 40 mil sheet metal to fill in the gap for rigidity:
I'll grind it down some more. This is going to be covered w/ contact paper anyways, so it does not have to be too pretty, just smooth. Also will fill in the gaps w/ metal glue.

Steel Wheels 3/01


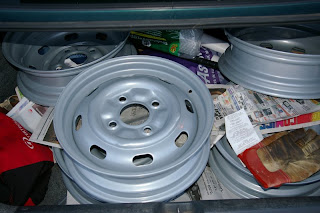
Purchased recycles wheels from the scrap yard for $65 and had them powder coated at San Diego's RW Little for $225. Not bad Eh?

Friday, February 22, 2008

I could grate cheese with this!

Ok, the windows are all removed, and I've started grinding down to bare metal in some suspect spots.


On advice of a Samba forum post, I took a closer look beneath the headlights. The driver's side is fine, but the passenger side had a tiny discoloration (sorry, no 'before' photo) about the size on a pinhead. Here's what the 2x3 inch area looked like after hitting it with the wire wheel...


Here's an area behind the wheel on the passenger's side. It also started out as a small blister before the wire wheel... now its an opening about the size of a golf ball.
I got some 40-mil aircraft-grade '4130' sheet metal from McMaster-Carr for about $38. The cost also includes angle iron I will use to make a Type III pulley wrench (from the Muir Book) and shipping.


Friday, February 15, 2008

Peeling the Onion

I purchased new window rubber for all side and rear windows from JBugs/California Pacific. Also got a new gas cap, since the old one was a locking type from WalMart and looked a bit ghetto ($228 total for the replacement rubber and gas cap). They were out of windshield rubber, so I will have to go back next week and get some.

Upon closer inspection...
After removing the window rubber, it looks like the rust beneath this rear quarter is a bit more extensive. This may require welding a 'donor piece', which is certainly more than I bargained for when I bought the car.

There is a hump in the driver's side floor pan. Don't know if this is from a wreck or if someone used the wrong jacking location at some point. May require floor pan replacement.

Battery pan rusted through. This is a common trouble spot, and at least new replacement battery pans are available. Guess I'll have to learn welding.
Posted by Picasa

'Before' Shots

I just bought a 1970 VW Squareback off eBay motors for $2550. I'm using this venue to journal the the time, techniques, and resources necessary to complete the job.

Initial purchase: I took the train up to my sister's place in LA. The previous owner ('PO' in VW message forum speak) Did not know too much about the car other than he was the 3rd owner, it ran well, and that the brakes did NOT work well. I drove it home from LA the rainy weekend of the Superbowl (Feb 2nd) and verified the car had anti-lock (and anti-stop!) brakes.

Took the car in to VW Paradise in San Marcos, CA to have the Master Cylinder and brake lines replaced the week of Feb 5th ($500). Drove it home and washed it to get a better look at the body.Pretty straight frame and fenders.
Hopefully this is all the rust that is under the side window.
The engine and tin are stock. Needs a new engine hatch gasket for sure.
Interior is ok but still damp from the rainy drive home. Inside is still the factory color (Savannah Beige?).

A bit of rust beneath the windshield. Hopefully this is no more rust beneath the windshield rubber.